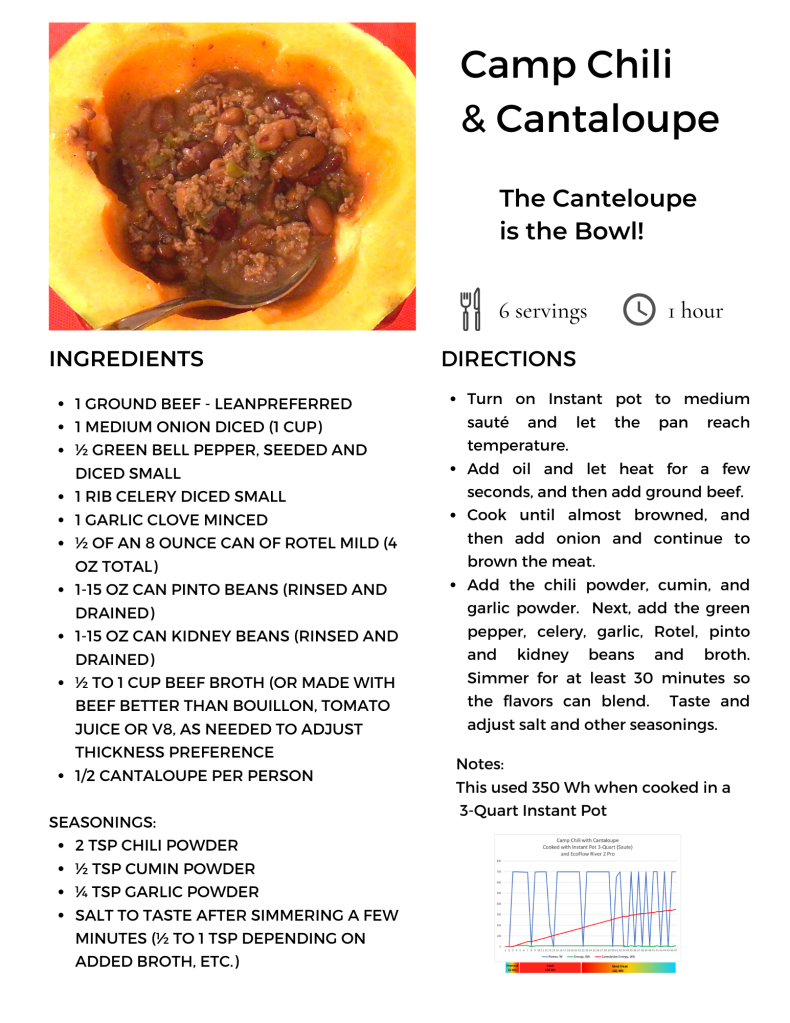
Camp Chili Cantaloupe Bowl!

Featured

Optional Ingredients and Seasonings:

Oregano

Cayenne pepper

Chipotle pepper

Cinnamon

Onion powder

Smoked Paprika

Paprika

Dash sugar or cooked mashed carrot if sweetness needed

Bulgur to bulk up (has texture of ground beef)

Toppings and Garnishes:

Green Onion

Sliced Jalapeno

Salsa – Red or Green

Favorite Hot Sauce

Cheddar Cheese

Lime wedges

Cilantro

Fritos / Tortillas

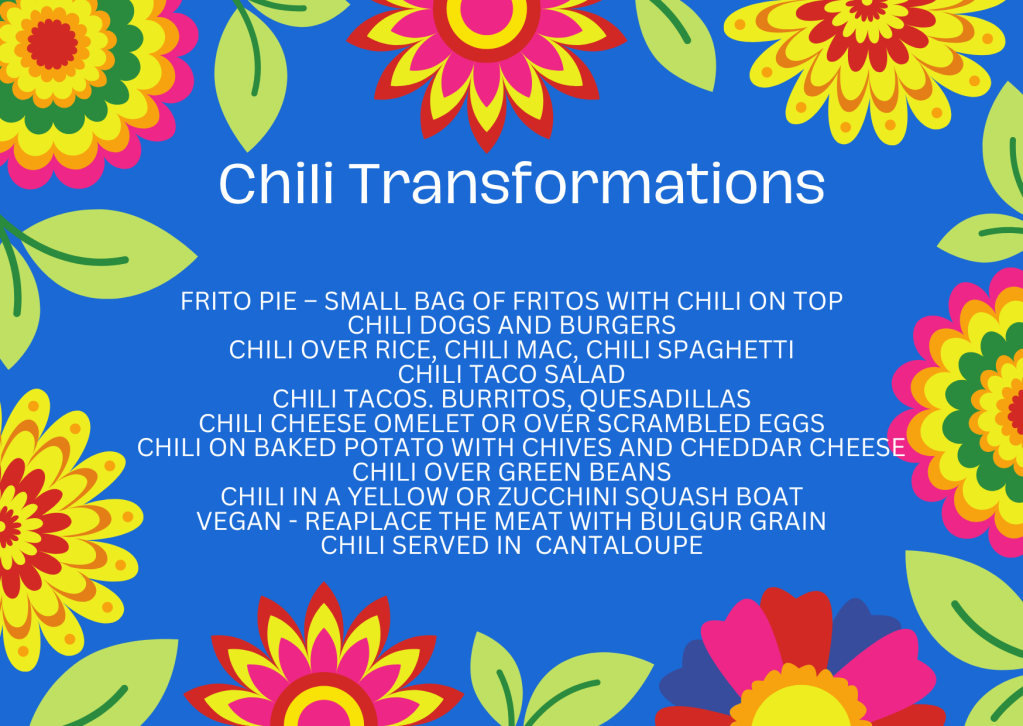
Serving Suggestions:

Frito Pie – Small Bag of Fritos with Chili on top

Chili Dogs and Burgers

Chili over Rice, Chili Mac, Chili Spaghetti

Chili Taco Salad

Chili Tacos. Burritos, Quesadillas

Chili Cheese Omelet or over scrambled eggs

Chili on Baked potato with chives and cheddar cheese

Chili in a yellow or zucchini squash boat

Chili served in half of a cantaloupe or with cantaloupe “croutons” 

Energy Usage:  350 Wh

Power Needs:  700 Watts

Time:  About an  hour – total

Servings:  Makes 8 cups

Instant Pot Accessories

Instant Pot Accessories

In the indelible words of Alton Brown from Good Eats TV show – No Uni-taskers!

I have rediscovered Corning Ware for the Instant Pot and camping! Not the new stuff (stoneware – easily identifiable with the bottom rim), but the old original Pyroceram based cookware (High heat ceramic glass and flat ceramic bottom). Corning Ware is non-toxic– no teflon, coatings, lead, etc. and the cookware can go directly from the freezer to a blazing hot oven, range top and microwave. One can even buy new Corning Pyroceram again, due to its rising popularity, at the Corning outlets – just make sure it states for range top use if planning to use it that way. Glass and plastic storage tops are still made and available for many of the older pieces at the outlet also. Goodwill and yard/estate sales are good places to check where used pieces can be found for a few dollars. The website http://www.Corningware411.com is a great resource to see which pieces came in different patterns, and has a great section on cleaning and recipes! Corning is easy to clean with baking soda or bar keepers friend (and sometimes toothpicks for the handle ridges).

This all brings me full circle back to use as an Instant Pot cooking accessory. Many of my smaller dishes fit the inner liner for Pot-in-Pot cooking and can be stacked for reheating leftovers or making new dishes. Going thru my cabinets, I found all these below that fit!

Left top to right bottom:

F-5-B – 1.5 Quart with glass and plastic lid below F-5-B – 1.5 Quart with glass and plastic lid below
F-65-B Sauce Maker (1 quart) with lid and detachable handle (from grandmother)
Arcoflam (1.5 quart with detachable handle – Corning from France)
F-16-B with plastic lid – 16 ounce – about 2 cups
F-150-B Corning and amber Visions Grab-It bowls with glass / plastic covers
F-15-B oval with lid (great for individual fish and side dish) – holds about 2 cups
Cut down silicon cover (works great while cooking in IP versus foil – Viancin)
P-43-B 2 ¾ cups with plastic lid
P-41-B 1¾ cups with glass lid
Fork and spoon to use for stacking layers between dishes

While all the plastic lids are used only for storage purposes (not cooking), the glass lids and the silicon cover can be used in the IP while be heated.
Being able to use the cookware in the IP and then microwave, gas burners and then store the cooked food, either in the refrigerator or freezer, make these great multi-taskers!

“Orange” – Baked Orange Vegetables

Spring is here and it is time to use up the last of my home-grown organic butternut squash.  Carrots and sweet potatoes round out the lineup of the three orange vegetables.

IMG_1768

Vegetables placed on a single layer for roasting

The vegetables were tested three different ways – open roasting, inside a foil packet and cooked in parchment paper (also known in French and as en papillote or al cartoccio in Italian).

All were cooked in a convection oven.  The difference between a convection oven and a conventional oven is the addition of a fan.  With the fan operating, the cooking time and/or temperature can be lowered.

Ingredients:

  • 1 pound each: butternut squash, carrots and sweet potatoes peeled and cut in 1 inch pieces
  • ¼ cup dried cranberries
  • ¼ cup pecan pieces
  • 1 -2 Tablespoons of liquid consisting of a combination of any of these:  water, olive oil, balsamic vinegar, orange juice, orange juice concentrate, maple syrup
  • 1 large pinch salt or to taste
  • 1 pinch freshly ground pepper

IMG_1787Method:

  • Prepare the vegetable and placed in a bowl and add other ingredients and mix (or do all this directly on the cooking surface of choice to reduce dishwashing).
  • This dish can be open roasted or put in foil or parchment paper packet (easiest cut in a moon or  heart shape with the paper folds starting at the fat top of the heart and close to the vegetables).

IMG_1789

Place vegetables in a single layer on the chosen food holder. In a pre-heated oven, cook for 50-60 min on 350F in a conventional oven or at 300F in a convection oven.

For a dryer texture, open roast on a sheet pan.  For a more “steamy” mouthfeel, cook  in a foil or parchment paper packet. The veggies should be fork tender at the end of cooking time.

Savory Pumpkin Soup

This recipe is for savory soup and not the typically pumpkin pie spiced soup. My friend Susan served this at a camping weekend on a cold fall afternoon under the brilliantly colored leaves on a New England Columbus Day Weekend.  Over the years, the pantry version was developed with pantry substitutions given in parenthesis.  This recipe is easily halved or made into a vegetarian version.  The recipe is well suited to a thermal cooker as only one pan is used.  Please treat this as a basic recipe and be creative by adding your own favorite spices – curry, cardamom, etc.  Substitute butternut squash or sweet potatoes.  All versions are very good!

Ingredients:

  • 2 tablespoons extra virgin olive oil
  • 2 ounces thinly sliced prosciutto, cut into thin strips (or 3 slices bacon) or leave out
  • 1 large onion, cut into 1/8 inch dice
  • 3 cloves garlic, minced
  • 1 can (28 ounce) plain pumpkin (fresh pumpkin not advised)
  • 1 quart vegetable or chicken broth
  • 1/8 teaspoon ground nutmeg
  • 1 teaspoon kosher salt
  • ¼ teaspoon ground white pepper (or black pepper if you don’t mind the specks)
  • ½ cup cream (at least 10% fat) or (½ cup skim milk w 1T butter) or (½ cup condensed milk) or (½ cup almond milk)
  • ½ cup freshly grated Parmigiano-Reggiano, Asiago, Romano, or smoked cheese (or ¼ cup Kraft parmesan cheese – green cylinder)
  • 2 tablespoon chopped fresh Italian parsley (2 teaspoon dried parsley)

Heat oil in deep skillet over medium high heat.  Add the prosciutto and saute’ until crisp and frizzled. Remove with slotted spoon and reserve.

Reduce heat to medium, add onion, sauté’ until tender (do not brown).  Add garlic, cook for a few seconds.  Stir in pumpkin, broth, nutmeg, salt, and pepper and bring to a boil.  Transfer to a 5 to 6 quart slow cooker, cover and cook for 3-4 hours on high, or 6-8 hours on low.

Stir in the cream and Parmesan, heat through about 5 minutes.   Stir in parsley and serve.


Girl Scout Hobo Packets and Cauliflower side dish

Image

Girl Scout Hobo Packet

When I was a Girl Scout on my first camping trip, our Troup Leader – Ms Trapane, taught us to make these packets and s’mores as part of earning our cooking and camping badges.  I have made them ever since!  These can be made in the oven or on the campfire.

For each packet:

  • 4-6 oz ground beef formed in a rounded pyramid
  • 1 large potato cut up into 2 inch cubes
  • 2 carrots cut into 2 inch lengths
  • 1 rib of celery cut into 2 inch lengths
  • ½ onion medium cut in 2 inch dice and separated
  • 1-2 tsp butter or oil (optional – add for more juice if meat is very lean)
  • Salt and ground black pepper to taste

Cut a piece of heavy duty aluminum foil about 18 inches long.  Place the meat in the center of the foil.  Surround the meat with the vegetables in one layer.  Bring the long ends of the foil together and fold down in 1 inch folds until formed around the meal.  Fold the remaining ends up and crimp forming around the meal.  Put in a medium fire until done or in a preheated 350°F oven for about 35-45 minutes.  Be very careful when opening packet as the steam will blast out – OPEN VERY SLOWLY!  Eat right out of the packet supported by a plate. Serve with a piece of toasted bread for soaking up the great juices!

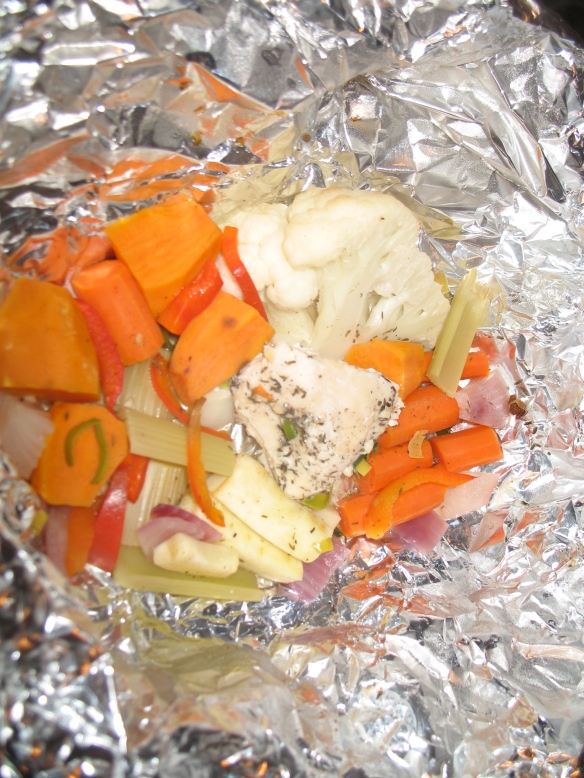
Hobo Packet made with Chicken, Cauliflower, Sweet Potato, Red Pepper, Red Onion, Celery, Carrot, Thyme, Basil, Garlic, Salt, Pepper

Hobo Packet made with Chicken, Cauliflower, Sweet Potato, Red Pepper, Red Onion, Celery, Carrot, Thyme, Basil, Garlic, Salt, Pepper

Some recommended substitutions are steak tips, beef stew meat, chicken, green beans, cabbage, parsnips, cauliflower or mix and match depending on taste buds of dinner mates.  These can be made ahead and cooked later in the day after a day full of adventure!

Cauliflower Side Dish

These can be made in the oven or in a Hobo packet

Ingredients:

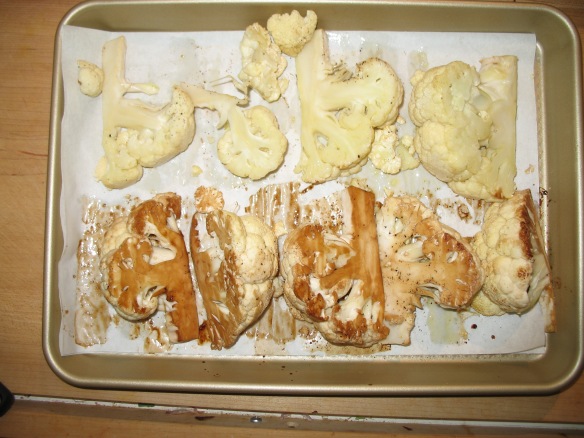
  • 1 head Cauliflower cut into 8 pieces with stem as ‘handle’
  • 1 TBSP Olive Oil
  • 1 TBSP Balsamic Vinegar (optional)
  • 1 clove garlic minced (optional)
  • Salt and Pepper to taste

Method:

Remove leaves from base of cauliflower.  Cut the cauliflower so that the stem can be used as a ‘handle’ for each piece.  Place the pieces on a pan for the oven, convection or toaster oven.  Drizzle the olive oil and balsamic over the cauliflower and then salt and pepper to taste.  Flip over to distribute on both sides.

Top seasoned with Olive Oil, Salt and Pepper                           Bottom has Balsamic Vinegar added

Top seasoned with Olive Oil, Salt and Pepper                     Bottom has Balsamic Vinegar added

Bake in a preheated oven at 350 degrees F for 15 minutes and then remove from oven and flip the cauliflower. Rotate pan 180 degrees and cook another 5-10 minutes.  The cauliflower will still be a little crunchy at 15-20 minutes and soft at 25 minutes.

Broccoli and cabbage can be cooked this way also or combined and cooked with the cauliflower.  This works well for asparagus, but should only be cooked about 15 minutes.

Hobo Packet

Hobo Packet

This side dish can be cooked in a hobo packet as well.  Taste great hot or cold!

Yellow Split Pea Soup – A Great Soup for a Cold Day

Yellow Split Pea Soup

(8-10 Servings or about 8 cups)

Winter went out with a vengeance here in New Hampshire yesterday leaving 16 inches of snow.  This soup helped warm us during the day after shoveling and cleaning snow off the Jeeps.

IMG_1718

Yellow split peas have a much milder flavor than their green cousins and remind me faintly of corn in both size and texture.  They are packed with protein and cook quickly.  The soup ingredients are varied in color and make me think of Spring while  cooking.

IMG_1713

This recipe is versatile and can easily be made vegan or adapted to use available pantry ingredients.  I originally made this during a cooking class with camping friends taught at the Culinary Underground Cooking School near Boston. That original recipe contained more salt pork and maple syrup.   Due to dietary restrictions, the recipe was adapted and those ingredients reduced when prepared yesterday – I liked it just as much.  The original amounts of bacon (or salt pork) and maple syrup are in parenthesis in the recipe.

Ingredients:

  • 1 ounce of bacon, finely diced (4 ounces salt pork or bacon)
  • 1 Tablespoon bacon fat, or canola oil
  • 1 cup rutabaga or turnip, finely diced
  • 1 large carrot, finely diced
  • 1 leek, finely chopped
  • 1 medium onion, finely diced
  • 1+½  cups split yellow peas (remove debris and rinse)
  • 6 cups water
  • 1 Tablespoon maple syrup (2-3 TBSP)
  • Salt and lots of black pepper to taste

Method:

In a Dutch Oven or soup pot, heat oil and fry the bacon until lightly browned.  Remove bacon with a slotted spoon and reserve.  Remove any excess oil except for 1 TBSP.

Add veggies to pot, sauté until soft – about 3-5 minutes.

Add peas, water and salt.

Bring to a boil, lower the heat, cover and cook for 25-30 minutes, or until peas are soft or the texture desired.  Pureeing the soup is an alternative if desired.  Thin with water if too thick.  If using a thermal cooker, cook for 1.5 to 2.5 hours.

Season with maple syrup, salt and pepper.  Serve with reserved bacon bits on top.

This soup makes me think of the sun!

IMG_1732

Cooking Beans in the Thermos Cook and Carry Thermal Cooker

Image

Beans are a valuable food for their fiber, protein and vitamins but very inexpensive for the money spent.   Hopefully the following information will aid in getting the desired results.  Beans are worth the wait and effort!

An experiment with variables of time and pre-soak and without pre-soak and was done. The results show the differences between level of doneness versus time and soaking method.  The temperature of the beans is shown versus time.  Due to the need to open the pot to check the temperature, the temperatures recorded are actually lower than if the cooking had not been disturbed.  The time to cook is similar to an electric slow cooker.

Experiment:

Three batches of pinto beans were compared:

  • Batch A – Pre-soaked for 8 hours in 3 TBSP table salt dissolved in 4 Quarts of water, rinsed well; After 8 hour pre-soak, they were boiled for 15 minutes and put in the thermal cooker (Cooks Illustrated Brining Method reference below shown in table)
  • Batch B – Quick pre-soaked by boiling 1 pound of beans in 4 quarts of plain water for 5 minutes and letting stand for an hour before finishing cooking (bean package); After 1 hour pre-soak, they were boiled for 15 minutes and put in the thermal cooker
  • Batch C – Not pre-soaked and boiled for 15 minutes and put in the thermal cooker

The full details of soaking, cooking and time are below.

Slide1

Temperature, Time, Cooking Method and Results when cooking beans in a Thermal Cooker

Pre-soaking helps to tenderize the beans and minimize effects when using hard water for cooking and are less flatulent.

When dried beans first begin their rehydration, the little spot that connects to the green bean as it grows is the main source of water entering the bean.  As the bean begins to hydrate, the skin starts to soften and continues to do so when in water.

Data showing Cooking Time vs. Doneness for each batch type is graphed below.

Slide2

Temperature vs. Time was recorded.  *Please note that the times are actually higher if cooking without opening the cooker for measurements.  Each time the cooker is opened, heat is lost due to experiment data collection.

Slide3

Equipment used for measurements:  Scale, Instant Thermometer, Infrared Thermometer

The 4.5Liter Thermos Cook and Carry

IMG_1688

 
Thermos Cook and Carry       Outer Pot on Left                                     Inner Pot on Right

After the Beans finished cooking, they were put into Canning Jars leaving 1.5 inches head space from the top of the rim to the beans.  These jars fit upright in most camper refrigerators or can be put in the freezer (head space as described necessary to prevent jar breakage).  When standing upright, they more efficiently fill the refrigerator space.   The rubber bands help reduce the bumps and rattles.  Labels are made from colored electrical tape using a Sharpie.  The labels are dishwasher safe and can be reused by simply peeling off and putting on the inside of a cabinet until needed again!  The plastic lid is made by Ball and available at good hardware stores or online, but are not for canning but great for freezing and pantry storage of (you guessed it) dried beans!

Rubber Bands help reduce bumps and rattles

Rubber Bands help reduce bumps and rattles.  Labels made using electrical tape and Sharpie

Bean Math*:

  • 1 Pound Dried Beans is $1.69 and makes 8 cups of cooked beans = 21 cents /cup
  • 1 can cooked beans is $0.99 and contains 1.75 cups cooked beans = 56 cents /cup
  • * Costs are only for the beans not the costs of cooking fuel, time, etc.

Good References on the science of cooking beans are:

  1. Cook’s Illustrated – The Science of Good Cooking America’s Test Kitchen, 2012
  2. On Food and Cooking – The Science and Lore of the Kitchen by Harold McGee 2004

Thanks for visiting!  Enjoy!!!

Thermos Bottle Cooking – They’re not just for Coffee Anymore

Over the past few months, I have been using a wide-mouth thermos to cook oats and pasta.  Rice or veggie soup using dehydrated vegetable with broth can we cooked this way also.  All of these are great to prepare ahead to have something warm on the hiking trail without hauling cooking stuff along.

With all of these methods, it is important to make sure that the food is still hot when removed from the thermos – above 145 degrees F for food safety – as measured with an instant read thermometer.  Cool and refrigerate promptly,

Thermos Bottle Selection and Preparation for Cooking

A Wide Mouth thermos is by far the best for cooking to reduce cleanup.  I use both a 17 ounce (»2 cups) and a 24 ounce (3 cups) making 1.5 and 2 servings respectively.  The general ratio of liquid to solid is 4:1.  Stanley and Thermos Nissan are both very good Thermos selections.  I have a dedicated thermos for food vs. coffee. It is best to size the desired serving to the thermos volume to maximize heat retention.

A stainless lined thermos is a must as internally plastic ones such as kids lunch box versions don’t hold heat well enough and glass lined have a tendency to break.

My favorite method for preparing to cook is to pour boiling water into the thermos, cap it and wait for ten minutes.  When all other ingredients are ready, pour the water out and replace with ingredients.  A crucial step is to shake and then lay the thermos with contents on its side to evenly distribute ingredients. An alternative method is to boil the contents for 10 minutes and put in thermos–this will reduce needed thermos cooking time.

Oats Great for preparing the night before

½ cup rolled or steel cut oats

1½ cup boiling water, pinch salt optional

spices such as cinnamon with nuts, raisins or dried fruits

honey, brown sugar or maple syrup to taste

Fill thermos bottle with boiling water, cap and wait 10 minutes.  Pour out water and put in new boiling water@212F.  Add ingredients and stir (I like using a chop stick).  Tightly screw on the lid to the thermos.  Shake the thermos a few times more to distribute the ingredients and lay thermos on side.  Wrap in a towel and wait 2 to 8 hours.  Oatmeal texture will be creamier the longer the oatmeal cooks in the thermos.  Add a little milk or water if too thick,

Cooking Pasta 

Prep thermos as described above. Add 1/3 by volume of pasta and 2/3 volume of boiling water to the thermos.  Add in seasonings such as salt, pepper, parsley, etc.  Cap, shake and lay thermos on side wrapped in towel for 30 minutes (any longer and the pasta gets mushy).  The pasta can be used for pasta salad or macaroni and cheese (don’t put cheese in thermos – but it can be tossed with pasta in serving bowl).  The added advantage is that the steam in our campers is kept to a minimum and reduces condensation and kitchen heat during summer months.

Play around with the thermos for some new flexibility for camp cooked meals. ENJOY!